This will be a quick and short post on using Azure Automation Runbook to add a Data Disk to one of the Azure VMs already provisioned on Azure and then initialize-format the Disk added using the Storage cmdlets available on Server 2012 onwards.
The Workflow is available @Technet >> Download
[Blog-Ad] Please check two of my earlier posts revolving around Azure Automation, if you are trying to use this feature for first tim:
Below is the explanation of the Workflow:
First we define a workflow by the name Add-DataDisktoVM, which will take 6 arguments :
After declaring all the params, time to step through the code logic.
This is it. Time to invoke the workflow. You can either use the Web Portal or use PowerShell from your workstation itself (I prefer it that way). But before we do that below is a screenshot showing the current Disks & partitions on my Azure VM named 'DexChef'.

If you use the Web portal to invoke the workflow then it prompts you to enter arguments to the parameters.
Below is how I invoked the Workflow from my Local Workstation using Azure PowerShell Module.

The Workflow is available @Technet >> Download
[Blog-Ad] Please check two of my earlier posts revolving around Azure Automation, if you are trying to use this feature for first tim:
PowerShell + Azure Automation : Deploy a Windows 10 VM (Server Tech Preview) & domain join
PowerShell + Azure Automation : Unleash the Automation Cmdlets
Below is the explanation of the Workflow:
First we define a workflow by the name Add-DataDisktoVM, which will take 6 arguments :
- AzureSubscriptionName - Name of the Azure Subscription to connect and automate against.
- ServiceName - Cloud Service name for the VM we are adding the data disk.
- StorageAccountName - storage account to be used.
- VMName - name of the Azure VM.
- VMCredentialName - Assuming you already have Automation Credential created for the Account to be used to Format, Initialize the Data Disk on the VM.
- AzureCredentialName - Name of the Automation Credential to be used to Connect to the Azure Subscription.
- SizeinGB - Size of the data disk to be added.
- DiskLabel - Label for the diisk that is going to be added (default: VMName).
Workflow Add-DataDisktoVM
{ Param ( #Specify the name of the Azure Subscription [parameter(Mandatory=$true)] [String] $AzureSubscriptionName, #Specify the Cloud Service in which the Azure VM resides [parameter(Mandatory=$true)] [String] $ServiceName, #Key in the Storage Account to be used [parameter(Mandatory=$true)] [String] $StorageAccountName, #Supply the Azure VM name to which a Data Disk is to be added [parameter(Mandatory=$true)] [String] $VMName, #Specify the name of Automation Credentials to be used to connect to the Azure VM [parameter(Mandatory=$true)] [String] $VMCredentialName, #Specify the name of the Automation Creds to be used to authenticate against Azure [parameter(Mandatory=$true)] [String] $AzureCredentialName, #Specify the Size in GB for the Data Disk to be added to the VM [parameter(Mandatory=$true)] [int] $sizeinGB, #Optional - Key in the Disk Label [parameter()] [string]$DiskLabel ) |
After declaring all the params, time to step through the code logic.
- Set the Verbosepreference to 'Continue' so that the Verbose Messages are written to the Job output Stream.
- Store the respective Azure & VM Automation Credentials in the Variables.
- Use the Azure Automation Credential to add Azure Account, select Subscription and set the storage account for the Azure Subscription in subsequent steps.
$verbosepreference = 'continue' #Get the Credentials to authenticate against Azure Write-Verbose -Message "Getting the Credentials" $AzureCred = Get-AutomationPSCredential -Name $AzureCredentialName $VMCred = Get-AutomationPSCredential -Name $VMCredentialName #Add the Account to the Workflow Write-Verbose -Message "Adding the AuthAzure Account to Authenticate" Add-AzureAccount -Credential $AzureCred #select the Subscription Write-Verbose -Message "Selecting the $AzureSubscriptionName Subscription" Select-AzureSubscription -SubscriptionName $AzureSubscriptionName #Set the Storage for the Subscrption Write-Verbose -Message "Setting the Storage Account for the Subscription" Set-AzureSubscription -SubscriptionName $AzureSubscriptionName -CurrentStorageAccountName $StorageAccountName |
Now we have successfully connected to our Azure Subscription. It is time to move on to task at hand...adding Data Disk to the Azure VM.
Below is what the below code does in subsequent steps :
Below is what the below code does in subsequent steps :
- Check if the DiskLabel is passed as an argument (If not then set the disk label to the VMname)
- Get the WinRMURI - used later to open a PSSession to the Azure VM
- Fetch the LUN numbers from already attached Data Disks to VM and calculate a unqiue LUN no to be used for the Data Disk we will add. If there are no Data Disks already added use a LUN value of 1.
- Inside an Inline Script block Add the Data Disk to the VM and update the Azure VM configuration to reflect it.
if (! $DiskLabel)
{ $DiskLabel = $VMName #set the DiskLabel as the VM name if not passed } #Get the WinRM URI , used later to open a PSSession Write-Verbose -Message "Getting the WinRM URI for the $VMname" $WinRMURi = Get-AzureWinRMUri -ServiceName $ServiceName -Name $VMName | Select-Object -ExpandProperty AbsoluteUri #Get the LUN details of any Data Disk associated to the Azure VM, Had to wrap this inside InlineScript Write-Verbose -Message "Getting details of the LUN added to the VMs" $Luns = InlineScript { Get-AzureVM -ServiceName $using:ServiceName -Name $using:VMName | Get-AzureDataDisk | select -ExpandProperty LUN } #Depending on whether the Azure VM already has DATA Disks attached, need to calculate a LUN if ($Luns) { Write-Verbose -Message "Generating a random LUN number to be used" $Lun = 1..100 | where {$Luns -notcontains $_} | select -First 1 } else { Write-Verbose -Message "No Data Disks found attached to VM" $Lun = 1 } #Finally add the Data Disk to Azure VM, again this needs to be put inside InlineScript block Write-Verbose -Message "Adding the Data Disk to the Azure VM using DiskLabel -> $DiskLabel ; LUN -> $Lun ; SizeinGB -> $sizeinGB" InlineScript { Get-AzureVM -ServiceName $using:ServiceName -Name $using:VMName | Add-AzureDataDisk -CreateNew -DiskSizeInGB $using:sizeinGB -DiskLabel $using:DiskLabel -LUN $using:Lun | Update-AzureVM } |
After we have successfully added the Data disk to the VM, it is time to Intialize the disk, Create a new partition and Format it. Did I tell you we will be doing all of this using the PowerShell Remoting Session.
Below is
Below is
# Open a PSSession to the Azure VM and then attach the Disk #using the Storage Cmdlets (Usually Server 2012 images are selected which have this module) InlineScript { do { #open a PSSession to the VM $Session = New-PSSession -ConnectionUri $Using:WinRMURi -Credential $Using:VMCred -Name $using:VMName -SessionOption (New-PSSessionOption -SkipCACheck ) -ErrorAction SilentlyContinue Write-Verbose -Message "PSSession opened to the VM $Using:VMName " } While (! $Session) Write-Verbose -Message "Invoking command to Initialize/ Create / Format the new Disk added to the Azure VM" Invoke-command -session $session -argumentlist $using:DiskLabel -ScriptBlock { param($label) Get-Disk | where partitionstyle -eq 'raw' | Initialize-Disk -PartitionStyle MBR -PassThru | New-Partition -AssignDriveLetter -UseMaximumSize | Format-Volume -FileSystem NTFS -NewFileSystemLabel $label -Confirm:$false } } } |
This is it. Time to invoke the workflow. You can either use the Web Portal or use PowerShell from your workstation itself (I prefer it that way). But before we do that below is a screenshot showing the current Disks & partitions on my Azure VM named 'DexChef'.
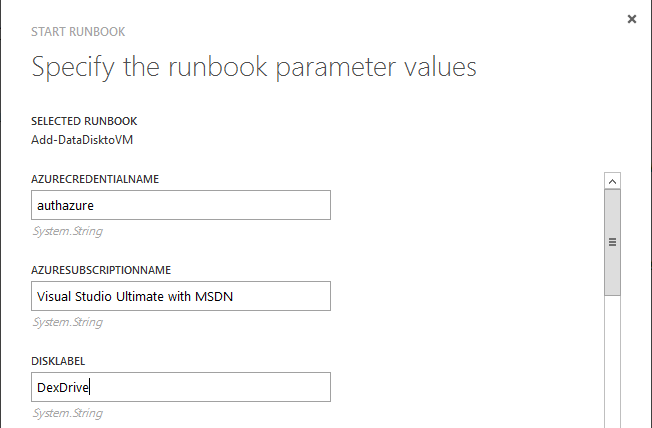
If you use the Web portal to invoke the workflow then it prompts you to enter arguments to the parameters.
Below is how I invoked the Workflow from my Local Workstation using Azure PowerShell Module.
$automation = Get-AzureAutomationAccount
$job = Start-AzureAutomationRunbook -Name Add-DataDisktoVM -AutomationAccountName $Automation.AutomationAccountName ` -Parameters @{AzureSubscriptionName="Visual Studio Ultimate with MSDN"; ServiceName="DexterPOSHCloudService"; StorageAccountName="dexposhstorage"; VMName="DexChef"; VMCredentialName="DomainDexterPOSH"; AzureCredentialName="authAzure"; SizeinGB = 20; DiskLabel = 'DexDisk' } -Verbose |
Now one can monitor the job created from portal or PowerShell and once it is completed. We will see the changes reflecting :)
Notice - a new Disk and partition showing up for the VM 'DexChef'
Notice - a new Disk and partition showing up for the VM 'DexChef'
Azure Automation does put using PowerShell Workflows in context and I enjoy using them :) .
Thanks to the Azure team for rolling out such an awesome feature.
Thanks to the Azure team for rolling out such an awesome feature.