Now for the first time you boot a Server Core..you get nothing but a Command Shell (cmd.exe).
Now before we begin further let's assign a static IP address to the Server Core VM.
REMINDER : My Lab has server named "DexterPOSH" Server 2012( on Physical Host) and then in Hyper-V a VM named "dexservercore" running Server Core 2012.
Open "Hyper-V Manager" and Right-Click and "Connect" to the VM (start it if it is not started yet)
There are actually three ways to do this..You may be familiar with all three maybe but I wanted to list all the ways to do this.
1. Using Netsh utility - this one is old school
But this one is depreciated see the screenshot below..It's recommending PowerShell ( will cover it in 3rd step)
anyways to set the IP address..first get your interface by using :

Now I have the interface with me...Time to set the IP address (old school)
Okey done.
2 . Using Sconfig utility - Server 2K8 R2 way
Now this Sconfig utility was introduced in Server 2008 R2 to easily get the Server Core up and bring it on the network , to enable the server management remotely. Type Sconfig in the cmd.exe and hit Enter.
Following screen shows up :
Now if you look at the options this one is a great utility to do simple configuration on the Server Core.
Now my IP Address is already set from above Netsh example..But I will still go and show you how to do it.
Press 8 to change the "Network Settings" then it will list the available Network Adapter. Choose the Index# to change the settings on that Network Adapter.
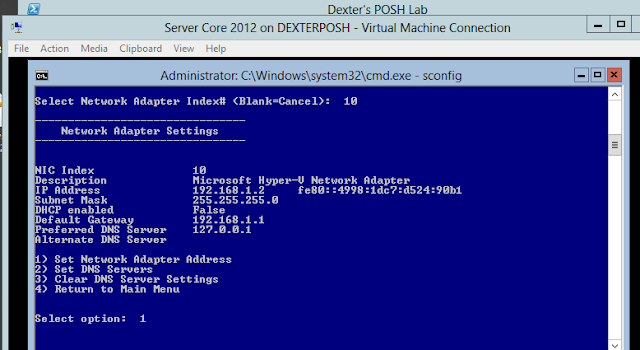
After selecting the Network Adapter. It will list the set of actions that can be performed on the Network Adapter..go ahead and select "1".
After this select the type of IP Address you want, we want the static IP address ...select "S" and then type in the IP Address...easy !
3. The PowerShell Way .. :)
Go the Cmd.exe and typer "Start PowerShell" to get the PowerShell console ....(Yay! Finally )
Now put the POSH console in the foreground.....Let's do this
Now First of all get all the network adapters using Get-NetAdapter...(PowerShell 3.0 dynamically loads the module so no need to load the Net* modules for this)
Then once you have the Adapter status ...go ahead and set the IP Address using New-NetIPAddress cmdlet. I used -whatif before actually using the cmdlet to be sure....then remove -whatif and perform the operation
Refer help for New-NetIPAddress.
Note that if the IP is already set then the New-NetIPAddress cmdlet throws an error. To show this and remove already present IP settings....what I did was use Remove-NetIPAddress cmdlet to remove the earlier settings.
Phewww..! This post went long....Thanks for bearing me (if you made this far).
Choose the method that fits you best..(hopefully the PowerShell way)
Thanks
~Dexter~
Now before we begin further let's assign a static IP address to the Server Core VM.
REMINDER : My Lab has server named "DexterPOSH" Server 2012( on Physical Host) and then in Hyper-V a VM named "dexservercore" running Server Core 2012.
Open "Hyper-V Manager" and Right-Click and "Connect" to the VM (start it if it is not started yet)
There are actually three ways to do this..You may be familiar with all three maybe but I wanted to list all the ways to do this.
1. Using Netsh utility - this one is old school
But this one is depreciated see the screenshot below..It's recommending PowerShell ( will cover it in 3rd step)
anyways to set the IP address..first get your interface by using :

Now I have the interface with me...Time to set the IP address (old school)
Okey done.
2 . Using Sconfig utility - Server 2K8 R2 way
Now this Sconfig utility was introduced in Server 2008 R2 to easily get the Server Core up and bring it on the network , to enable the server management remotely. Type Sconfig in the cmd.exe and hit Enter.
Following screen shows up :
Now if you look at the options this one is a great utility to do simple configuration on the Server Core.
Now my IP Address is already set from above Netsh example..But I will still go and show you how to do it.
Press 8 to change the "Network Settings" then it will list the available Network Adapter. Choose the Index# to change the settings on that Network Adapter.
After selecting the Network Adapter. It will list the set of actions that can be performed on the Network Adapter..go ahead and select "1".
After this select the type of IP Address you want, we want the static IP address ...select "S" and then type in the IP Address...easy !
3. The PowerShell Way .. :)
Go the Cmd.exe and typer "Start PowerShell" to get the PowerShell console ....(Yay! Finally )
Now put the POSH console in the foreground.....Let's do this
Now First of all get all the network adapters using Get-NetAdapter...(PowerShell 3.0 dynamically loads the module so no need to load the Net* modules for this)
Then once you have the Adapter status ...go ahead and set the IP Address using New-NetIPAddress cmdlet. I used -whatif before actually using the cmdlet to be sure....then remove -whatif and perform the operation
Refer help for New-NetIPAddress.
Note that if the IP is already set then the New-NetIPAddress cmdlet throws an error. To show this and remove already present IP settings....what I did was use Remove-NetIPAddress cmdlet to remove the earlier settings.
Phewww..! This post went long....Thanks for bearing me (if you made this far).
Choose the method that fits you best..(hopefully the PowerShell way)
Thanks
~Dexter~


